
Introduction
Wrapping windows with aluminum is a great way to improve the insulation and durability of your home’s windows. It also adds an attractive aesthetic touch to any room. Before beginning this project, it’s important to understand the process and the benefits that come with wrapping windows with aluminum.

Definition of Wrapping Windows with Aluminum
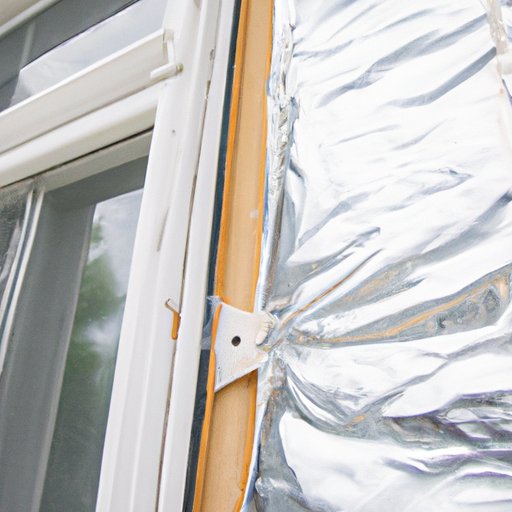
Wrapping windows with aluminum is a process of covering the window frame with a thin sheet of aluminum. The aluminum is cut to size and applied directly to the window frame using adhesive tape or caulk. Once the aluminum wrap has been applied, it can be painted or left as is. The result is a window frame that is better insulated from outside temperatures and is more durable than a traditional wood or plastic frame.

Overview of Benefits of Wrapping Windows with Aluminum
Wrapping windows with aluminum offers many benefits, including increased insulation, enhanced durability, and improved aesthetics. When installed properly, an aluminum wrap can provide extra protection against extreme temperatures, keeping the interior of your home comfortable all year round. Additionally, aluminum wraps are much more durable than traditional wooden frames, making them ideal for homes in areas prone to high winds or severe weather. Finally, aluminum wraps offer an attractive finish that can enhance the look of any room.
Step-by-Step Guide to Wrapping Windows with Aluminum
Wrapping windows with aluminum is a relatively simple process that can be completed in four easy steps.
Preparing the Window for Wrapping
Before applying the aluminum wrap, the window frame must be properly prepared. This includes cleaning the frame to remove any dirt, dust, or debris. You may also need to sand the frame if it is particularly rough or uneven. Once the frame has been cleaned and sanded, it should be wiped down with a damp cloth to remove any remaining dust or residue.
Measuring and Cutting the Aluminum Wrap
Once the frame is prepped, you will need to measure and cut the aluminum wrap to size. Measure the width and height of the window frame and use these measurements to cut the aluminum wrap accordingly. If the aluminum wrap is too large, trim it down with a pair of scissors or a utility knife.
Applying the Wrap
Once the aluminum wrap is cut to size, it is ready to be applied to the window frame. Start by applying a thin layer of adhesive to the back of the wrap. Then, press the wrap firmly onto the window frame, starting at one corner and working your way around the frame. Be sure to press firmly to ensure the wrap is securely attached to the frame.
Finishing Touches
Once the aluminum wrap is securely attached to the window frame, you can add the finishing touches. This includes adding trim pieces around the edges of the wrap to give it a finished look. You can also use caulk or sealant to fill in any gaps or cracks between the wrap and the frame.
DIY Tips for Installing Aluminum Wraps on Windows
Installing aluminum wraps on windows is a straightforward process, but there are a few tips to keep in mind when taking on this project yourself.
Choosing the Right Tools and Materials
When it comes to installing aluminum wraps on windows, the right tools and materials are essential. Make sure to choose an aluminum wrap that is thick enough to provide adequate insulation and durability. You will also need a measuring tape, scissors or a utility knife, adhesive, and caulk or sealant.
Taking Precautions to Avoid Damage
When installing aluminum wraps on windows, it’s important to take precautions to avoid damaging the window frame. Make sure to use a soft cloth when cleaning the frame and avoid using abrasive cleaners or scrub brushes. Also, be careful when cutting the aluminum wrap to size, as sharp edges can easily scratch or gouge the frame.
Tips for Working with Adhesives
When applying the aluminum wrap to the window frame, it’s important to use the right type of adhesive. For best results, choose an adhesive that is designed specifically for aluminum wraps. Make sure to read the instructions on the adhesive carefully, as some adhesives require specific drying times or temperatures.
How to Save Money by Wrapping Windows with Aluminum Yourself
Wrapping windows with aluminum can be a costly endeavor, but there are ways to save money by doing the work yourself. Shopping around for the best deals on materials and tools is a great way to save money. Additionally, there are plenty of YouTube tutorials available that can help you learn the process. Finally, if you have an old aluminum wrap lying around, consider reusing it to cut down on costs.

Exploring the Benefits of Wrapping Windows with Aluminum
Wrapping windows with aluminum can provide numerous benefits to your home. Here are just a few of the advantages of this project.
Improved Insulation
One of the main benefits of wrapping windows with aluminum is improved insulation. The aluminum wrap acts as a barrier, preventing hot or cold air from entering the home. This can help reduce energy costs and make your home more comfortable year-round.
Increased Durability
Aluminum wraps are much more durable than traditional wooden frames, making them ideal for homes in areas prone to high winds or severe weather. The aluminum wrap also provides additional protection against moisture, which can extend the life of your windows.
Enhanced Aesthetic Appeal
In addition to providing improved insulation and increased durability, aluminum wraps can also add an attractive finish to any room. Aluminum wraps come in a variety of colors and finishes, so you can customize the look of your windows to fit your style.
What You Need to Know Before Wrapping Your Windows with Aluminum
Before beginning this project, there are a few things you should know. Here are some tips to keep in mind before wrapping your windows with aluminum.
Local Building Codes
It’s important to familiarize yourself with local building codes before beginning this project. Some areas may have restrictions on the types of materials that can be used for window wraps, so make sure to check with your local authorities before proceeding.
Working with Professional Installers
If you are not confident in your ability to do the job yourself, you may want to consider hiring a professional installer. Professional installers have the experience and expertise to ensure the job is done correctly, saving you time and money in the long run.
Potential Pitfalls to Avoid
Finally, make sure to research potential pitfalls before beginning this project. Common problems include incorrect measurements, improper adhesion, and inadequate insulation. Knowing what to expect can help you avoid these issues and ensure a successful installation.
Conclusion
Wrapping windows with aluminum is a great way to improve the insulation and durability of your home’s windows. It also adds an attractive aesthetic touch to any room. Preparing the window, measuring and cutting the aluminum wrap, applying the wrap, and adding finishing touches are all essential steps in the process. DIYers can save money by shopping around for the best deals and utilizing YouTube tutorials. Ultimately, wrapping windows with aluminum offers numerous benefits and is a project that anyone can take on.