
Introduction
Welding aluminum is a complex task that requires specialized equipment and knowledge. One of the most popular methods of welding aluminum is TIG (Tungsten Inert Gas) welding. TIG welding is a type of arc welding that uses a non-consumable tungsten electrode to create an electric arc between the electrode and the metal being welded. This arc melts the metal, allowing it to be fused together. The inert gas used in TIG welding protects the weld from oxidation and other contaminants. In this article, we will explore how to weld aluminum with a TIG welder.

Overview of TIG Welding Aluminum
TIG welding is a versatile method used to join metals such as aluminum, stainless steel, and copper. It can be used to create structural components, repair damaged parts, or fabricate custom pieces. TIG welding is often preferred because it produces clean, precise welds without the need for filler material. Additionally, TIG welding allows for detailed control over the heat, speed, and arc length, which are all important factors when welding aluminum.
Benefits of TIG Welding Aluminum
TIG welding aluminum offers several advantages over other welding processes. It allows for greater precision and accuracy than other welding processes, making it ideal for intricate projects. Additionally, TIG welding produces strong and durable welds that are resistant to corrosion and other environmental factors. Finally, TIG welding can be done quickly, saving time and money.
Preparation Required for TIG Welding Aluminum
Before beginning a welding project, it is important to make sure that the materials and equipment are properly prepared. This includes properly cleaning the metal, selecting the correct filler material, assembling the TIG welder, selecting the correct tungsten electrode, and setting the amperage and voltage.
Properly Clean the Metal
It is important to ensure that the surface of the metal is clean before welding. Any dirt, oil, or other contaminants on the surface can cause contamination in the weld, resulting in a weak or flawed weld. To clean the metal, use a wire brush, sandpaper, or a chemical cleaner specifically designed for welding.
Select the Correct Filler Material
When TIG welding aluminum, it is important to select the correct filler material. Filler materials are available in different sizes and shapes, so it is important to choose one that is compatible with the type of aluminum being welded. Additionally, the type of filler material selected should match the desired strength and appearance of the weld.

Proper Setup for TIG Welding Aluminum
After the materials and equipment have been properly prepared, it is time to set up the TIG welder. This includes assembling the welder, selecting the correct tungsten electrode, and setting the amperage and voltage.
Assemble the TIG Welder
Begin by assembling the TIG welder according to the manufacturer’s instructions. Make sure all connections are secure and the torch is firmly attached to the power source. Once the welder is assembled, check that all settings are correct.
Select the Correct Tungsten Electrode
The tungsten electrode is the key component of the TIG welding process. It is important to select the correct electrode for the job. Generally, a 2% thoriated tungsten electrode is used for aluminum welding. However, it is best to consult the manufacturer’s recommendations for more specific information.
Set the Amperage and Voltage
The amperage and voltage settings are crucial for producing a successful weld. The settings should be adjusted based on the thickness of the material being welded. Thinner materials require lower amperage and higher voltage settings, while thicker materials require higher amperage and lower voltage settings. It is best to start with a lower setting and adjust as needed.
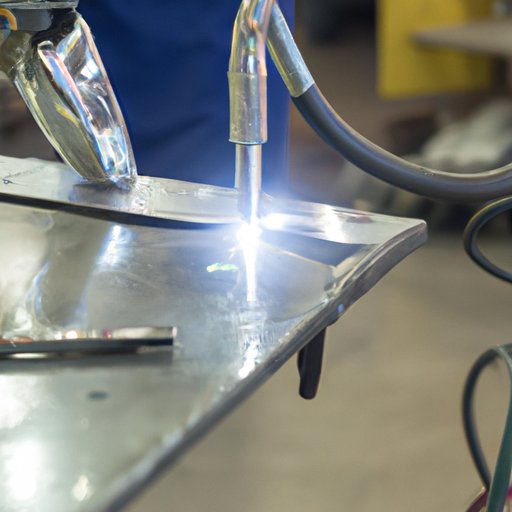
Demonstration of How to Operate a TIG Welder on Aluminum
Once the welder is properly set up and the material is properly prepared, it is time to begin welding. The following steps demonstrate how to operate a TIG welder on aluminum.
Strike an Arc
Begin by striking an arc between the tungsten electrode and the metal. To do this, press the electrode against the metal and activate the foot pedal or toggle switch. This will cause the current to flow through the electrode and create an arc.
Maintain the Arc Length
Once the arc has been struck, it is important to maintain a consistent arc length. The arc length should be about 1/8 inch for aluminum welding. If the arc length is too long, the weld may become too hot and produce excessive spatter. If the arc length is too short, the weld may be weak or incomplete.
Move the Torch
Once the arc is established, move the torch along the joint at a steady pace. This will ensure an even, consistent weld. Keep the torch perpendicular to the joint and maintain a consistent arc length.
Add Filler Material
If necessary, add filler material to the weld as you go. The filler material should be added slowly and evenly. This will ensure a strong, uniform weld.
Stop the Arc
When you have reached the end of the weld, stop the arc by releasing the foot pedal or toggle switch. Allow the weld to cool before inspecting it.
Post-Weld Cleanup Process for Aluminum
After the weld has cooled, it is important to perform a post-weld cleanup. This includes removing any slag and inspecting the weld for defects. To remove slag, use a chipping hammer or grinder. After the slag has been removed, inspect the weld for cracks, porosity, or other defects.

Tips and Tricks for Successful TIG Welding Aluminum
There are several tips and tricks that can help ensure successful TIG welding of aluminum. Utilizing a heat sink, using abrasive discs for cleaning, and wearing appropriate safety gear are all important aspects of TIG welding.
Utilize a Heat Sink
Using a heat sink is an important part of TIG welding aluminum. A heat sink is a device that absorbs and dissipates heat away from the weld area. This helps prevent warping and distortion of the metal during welding. Most TIG welders come with a heat sink attachment.
Use Abrasive Discs for Cleaning
Using abrasive discs for cleaning is a quick and effective way to prepare the metal for welding. Abrasive discs can be used to remove rust, scale, and other contaminants from the metal. They can also be used to clean the edges of the weld to give it a smooth, professional finish.
Wear Appropriate Safety Gear
TIG welding involves working with high temperatures and electrical currents, so it is important to take the necessary safety precautions. Wear protective clothing, including a welding helmet, gloves, and apron. Additionally, make sure to use properly rated welding cables and ground clamps.
Conclusion
TIG welding aluminum can be a challenging task, but with the right preparation and knowledge, it can be done successfully. This article provided a step-by-step guide on how to weld aluminum with a TIG welder. It covered the preparation required, proper setup, demonstration of how to operate the welder, post-weld cleanup process, and tips and tricks for successful TIG welding. With the right technique and safety measures, you can produce strong, durable welds that will last for years.