
Introduction
Melting aluminum cans is a great way to recycle and can be done with several different methods. By melting cans, you can create art pieces, jewelry, and other items. This article will provide an overview of the process of melting aluminum cans, the benefits of doing so, and the different ways to get the job done.
Using a Charcoal Grill
One method of melting aluminum cans is to use a charcoal grill. To do this, you need to set up your charcoal grill in an area that is well ventilated and away from flammable objects. Once the charcoal is lit, place the can on top of the grill and slowly turn it until the aluminum has melted. This method works best if you have a large number of cans to melt because the heat produced by the charcoal will be more consistent than other methods.
The pros of using a charcoal grill are that it’s relatively easy to set up and it produces a consistent heat source. The cons are that it takes some time to melt the cans and there is a risk of fire if the charcoal isn’t monitored closely.
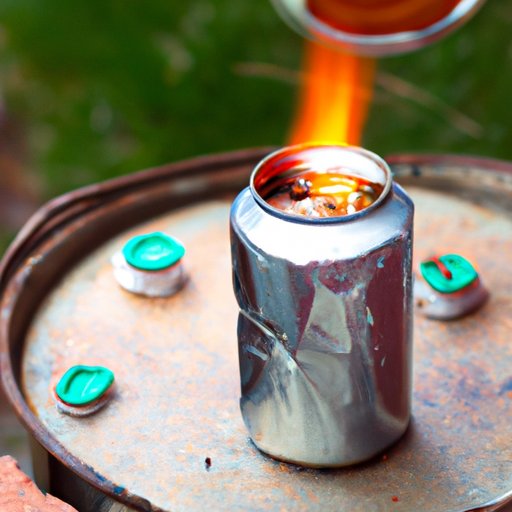
Utilizing a Propane Torch
Another method of melting aluminum cans is to use a propane torch. This method is faster than using a charcoal grill, but it is also more dangerous because of the open flame. To use a propane torch, light the torch and hold it close to the can while slowly turning the can. Make sure to keep the torch at least a foot away from the can and wear protective gear, such as gloves and goggles, to protect yourself from the heat and sparks.
The pros of using a propane torch are that it is fast and efficient. The cons are that it is dangerous and requires extra safety precautions.

Applying Heat with a Blowtorch
A third method of melting aluminum cans is to use a blowtorch. This method is similar to using a propane torch, but it uses a much higher heat source. To use a blowtorch, light the torch and hold it close to the can while slowly turning the can. Make sure to keep the torch at least two feet away from the can and wear protective gear, such as gloves and goggles, to protect yourself from the heat and sparks.
The pros of using a blowtorch are that it is fast and efficient. The cons are that it is dangerous and requires extra safety precautions.
Boiling in Water
A fourth method of melting aluminum cans is to boil them in water. To do this, fill a large pot with water and bring it to a boil. Then, carefully add the cans to the water and allow them to boil for 1-2 hours. The cans should begin to dissolve in the hot water and eventually melt. Once the cans have melted, pour the mixture into a container and allow it to cool before handling.
The pros of boiling in water are that it is relatively safe and doesn’t require any extra safety gear. The cons are that it takes a long time to melt the cans and there is a risk of the cans exploding if they are heated too quickly.
Employing a Homemade Furnace
A fifth method of melting aluminum cans is to use a homemade furnace. To make a homemade furnace, you need to build a box out of fireproof material such as brick or concrete. Inside the box, you need to place a metal rack and then light a fire underneath the rack. Once the fire is lit, place the cans on the rack and allow them to melt. This method works best if you have a large number of cans to melt because the heat produced by the fire will be more consistent than other methods.
The pros of using a homemade furnace are that it is relatively easy to set up and it produces a consistent heat source. The cons are that it takes some time to melt the cans and there is a risk of fire if the fire isn’t monitored closely.
Taking Advantage of Solar Heat
The final method of melting aluminum cans is to use solar heat. To do this, you need to set up a solar oven in an area that gets plenty of sunlight. Place the cans in the oven and allow them to bake for several hours. The cans should begin to melt as the solar oven heats up. Once the cans have melted, remove them from the oven and allow them to cool before handling.
The pros of using solar heat are that it is safe and doesn’t require any extra safety gear. The cons are that it takes a long time to melt the cans and the results may vary depending on the amount of sunlight available.
Conclusion
In conclusion, there are several different methods for melting aluminum cans. Each method has its own advantages and disadvantages, so it is important to consider which method is best for you. If you have a large number of cans to melt, a charcoal grill or homemade furnace may be your best bet. If you only need to melt a few cans, a propane torch or blowtorch may be your best option. Finally, if you want a safe and easy method, boiling the cans in water or taking advantage of solar heat may be your best choice.
No matter which method you choose, melting aluminum cans is a great way to recycle and create unique pieces of art.