
Introduction
Soldering is the process of joining two metals together by melting a filler material into a joint. The filler material is usually made of a lead-free alloy, such as tin and silver, which melts at relatively low temperatures. Soldering is typically used for electrical connections or plumbing applications, but it can also be used to join aluminum and copper. However, soldering aluminum and copper is not always easy and requires careful preparation and consideration.

What You Need to Know Before Soldering Aluminum to Copper
Before you begin soldering aluminum to copper, there are a few things you need to know. First, you must choose the right materials for the job. You will need a soldering iron, solder wire, flux, and cleaning cloths. Additionally, you should make sure that the copper and aluminum pieces are clean and free of dirt, oil, and other contaminants. Finally, you should familiarize yourself with the soldering process and understand how to properly heat the joint and apply the solder.
How to Successfully Solder Aluminum to Copper
Once you have all of the necessary materials and have prepared the copper and aluminum pieces, you can begin soldering. Here is a step-by-step guide for successfully soldering aluminum to copper:
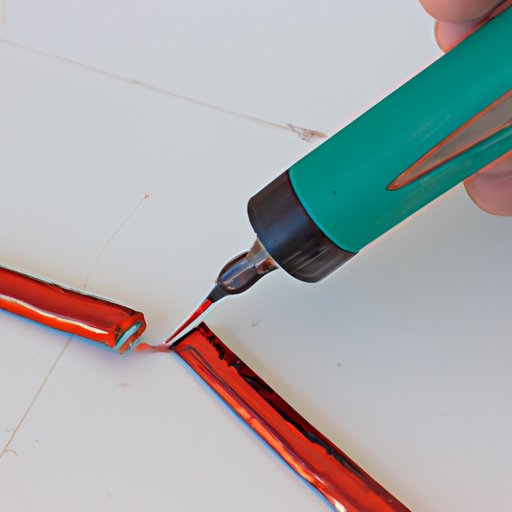
1. Cleaning and Tinning
Before soldering, you should clean the copper and aluminum pieces with a steel wool pad and rubbing alcohol. This will remove any dirt, oil, or other contaminants from the surface. Next, you should apply a thin layer of solder to the copper piece. This is known as “tinning” and will help the solder stick to the copper better.
2. Applying Flux
Flux is a special chemical that helps the solder flow more easily. It also prevents oxidation of the metal, which can cause corrosion. Apply a thin layer of flux to both the copper and aluminum pieces before soldering.
3. Heating the Joint
Next, you will need to heat the joint with the soldering iron. Make sure the tip of the iron is clean and free of debris. Heat the joint until it is hot enough to melt the solder. If the joint is too cold, the solder won’t flow properly.
4. Adding the Solder
Once the joint is hot enough, add the solder. Allow the solder to flow freely into the joint. Once the joint is filled, remove the heat source and allow the joint to cool.
5. Cooling and Inspecting
Once the joint has cooled, inspect it for any signs of defects. If everything looks good, the joint is ready for use.
The Right Technique
When soldering aluminum to copper, it is important to use the right technique. Make sure to keep the soldering iron moving while heating the joint. This will ensure that the entire joint is heated evenly and will prevent overheating of the aluminum. Additionally, make sure to use a low-temperature solder and flux, as aluminum has a lower melting point than copper.

Advantages and Disadvantages of Soldering Aluminum to Copper
Soldering aluminum to copper has both advantages and disadvantages. One of the main advantages is that it creates a strong, durable bond between the two metals. Additionally, soldering is a relatively inexpensive and easy process. On the other hand, soldering aluminum to copper can be difficult if the proper technique is not used. Additionally, the soldered joint may not be as strong as a welded joint.

Common Mistakes to Avoid When Soldering Aluminum to Copper
There are a few common mistakes to avoid when soldering aluminum to copper. First, make sure to clean the joints thoroughly before soldering. Any dirt, oil, or other contaminants can prevent the solder from flowing properly. Additionally, make sure not to overheat the joint. Aluminum has a lower melting point than copper and can easily be damaged if overheated. Finally, make sure to use the right type of soldering iron, solder, and flux. Using the wrong materials can cause the joint to fail.
Conclusion
Soldering aluminum and copper together can be a difficult process, but with the right materials and technique, it can be done successfully. Make sure to choose the right materials, prepare the pieces, and understand the process before beginning. Additionally, make sure to clean the joint, use the right temperature, and use the right type of solder and flux. By following these steps, you can create a strong, durable joint between aluminum and copper.
Summary of Main Points
Soldering aluminum to copper is not always easy, but it is possible with the right materials and technique. Before beginning, make sure to clean the pieces, choose the right materials, and understand the process. Additionally, make sure to keep the soldering iron moving and not to overheat the joint. With the right preparation and technique, you can successfully solder aluminum to copper.
Final Thoughts
Soldering aluminum to copper can be a tricky process, but with the right preparation and technique, it can be done successfully. Make sure to clean the pieces, use the appropriate materials, and follow the correct procedure. By taking the time to do it right, you can create a strong, durable joint between aluminum and copper.